Student Management Household Tab
Students > Student Management > Household
The fields on this page represent the household information of the student. Household information is importable and can be added manually as needed.
Student with Household
-
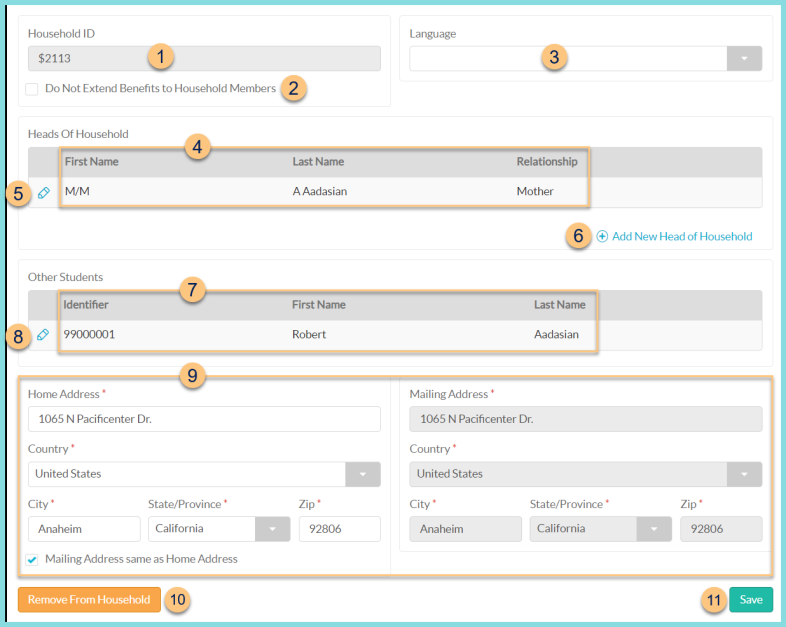
Household ID - notice the Household ID
-
Do Not Extend Benefits to Household Members - check to prevent this student from extending direct certification benefits to other student household members if applicable
-
Language - select household language, which determines the language of letters sent to household
-
Notice the First Name, Last Name, and Relationship of the head(s) of household
-
Pencil - click to edit Head of Household information. See Step 6 for details. Note: Edits will be overridden by the student import.
-
(+) Add New Head of Household - click to add a new head of household
-
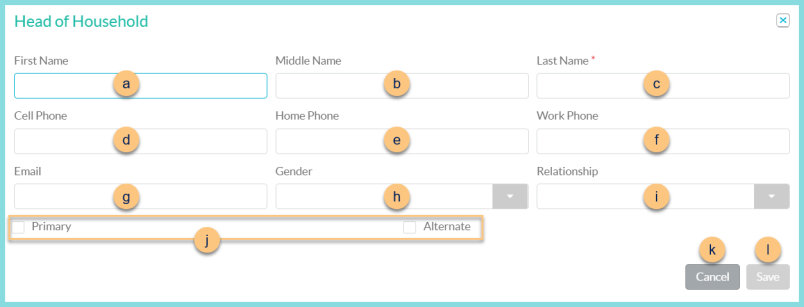
First Name - enter first name
-
Middle Name - enter middle name
-
Last Name - enter last name
-
Cell Phone - enter cell phone
-
Home Phone - enter home phone
-
Work Phone - enter work phone
-
Email - enter email address
-
Gender - select gender
-
Relationship - select relationship
-
Primary, Alternate - select whether this is the primary Head of Household or an alternate Head of Household
-
Cancel - click to return to the previous screen without saving changes
-
Save - click to save changes
-
Notice the Identifier, First Name, and Last Name of students with a matching Household ID
-
Pencil - click to be redirected to the student's general tab
-
Enter the Home Address, Country, City, State/Province, and Zip. Check Mailing Address same as Home Address to copy the Home Address to the Mailing Address. Otherwise, enter the Mailing Address, Country, City, State/Province, and Zip.
-
Remove From Household - click to remove the student from the household so that the student can be added to a different household.
-
Save - click to save changes
Student without Household
If Auto Assign Household ID is not enabled and a household ID was not configured upon import, there will be no information on the screen, and a household can be configured manually.

-
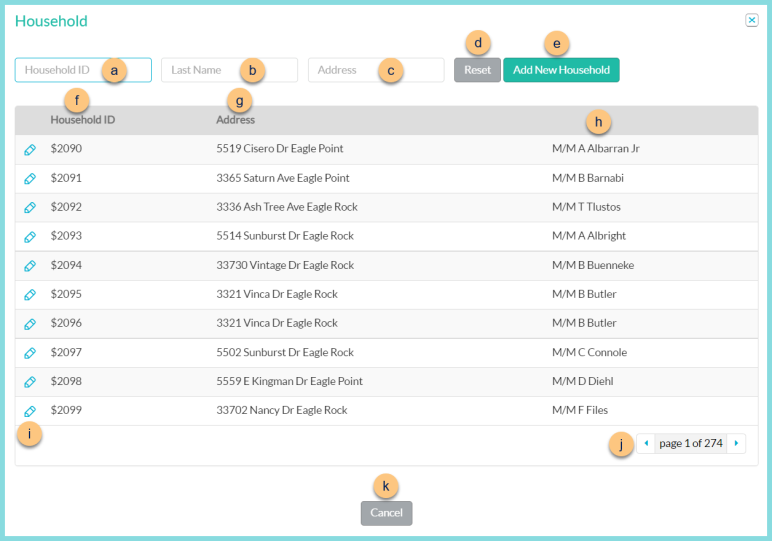
Search for Household - click to search existing households or to create a new household
-
Household ID - search by household identifier
-
Last Name - search by head of household last name
-
Address - search by household street address
-
Reset - click to reset search parameters
-
Add New Household - click to create a new household. See Step 9 for more information about adding the Home Address and Mailing Address. Click Save. Then proceed with above household steps 1-11 as needed.
-
Household ID - notice Household Identifier
-
Address - notice the household street address
-
Notice the Head of Household name.
-
Pencil - click to select the household to which to assign the student
-
< > - click to scroll through pages
-
Cancel - click to return to the previous screen without selecting a household